- Infos im HLRS Wiki sind nicht rechtsverbindlich und ohne Gewähr -
- Information contained in the HLRS Wiki is not legally binding and HLRS is not responsible for any damages that might result from its use -
CRAY XC40 Graphic Environment: Difference between revisions
No edit summary |
|||
| (2 intermediate revisions by the same user not shown) | |||
| Line 144: | Line 144: | ||
<pre> | <pre> | ||
module laod tools/VirtualGL | module laod tools/VirtualGL | ||
module load tools/paraview/ | module load tools/paraview/5.3.0-git-master-Pre | ||
vglrun paraview | vglrun paraview | ||
</pre> | </pre> | ||
| Line 155: | Line 155: | ||
On the mom node do: | On the mom node do: | ||
<pre> | <pre> | ||
module load tools/paraview/ | module load tools/paraview/5.3.0-git-master-parallel-Mesa | ||
aprun -n XX*YY -N YY pvserver | aprun -n XX*YY -N YY pvserver | ||
</pre> | </pre> | ||
| Line 175: | Line 175: | ||
Connect to the VNC-session by one of the methodes issued by the script. Within the VNC-session open a terminal and execute: | Connect to the VNC-session by one of the methodes issued by the script. Within the VNC-session open a terminal and execute: | ||
<pre> | <pre> | ||
module load tools/paraview/ | module load tools/paraview/5.3.0-git-master-Pre | ||
pvconnect -pvs nidxxxxx:portno -via momX | pvconnect -pvs nidxxxxx:portno -via momX | ||
</pre> | </pre> | ||
Latest revision as of 11:36, 19 November 2018
For graphical pre- and post-processing purposes 3 smp nodes equipped with 512 GB of main memory and 5 smp nodes equipped with 256 GB of main memory have been integrated into the external nodes of Hazelhen. Access to a single node is possible by using one of the node features mem512gb, mem256gb or mem128gb.
user@eslogin00X> qsub -I -lnodes=1:mem512gb
Another two multi user smp nodes are equipped with 1.5 TB of memory. Access to these nodes is possible by using the node feature smp and the smp queue. Access is scheduled by the amount of required memory which has to be specified by the vmem feature.
user@eslogin00X> qsub -I -lnodes=1:smp:ppn=1 -q smp -lvmem=5gb
To use the graphic hardware for remote rendering there are currently two ways tested. The first is via TurboVNC the second one is directly via VirtualGL.
VNC Setup
If you want to use the CRAY XC Graphic Hardware e.g. for graphical pre- and post-processing, on way to do it is via a vnc-connection. For that purpose you have to download/install a VNC viewer to/on your local machine.
E.g. TurboVNC comes as a pre-compiled package which can be downloaded from http://sourceforge.net/projects/turbovnc/. For Fedora 20 the package tigervnc is available via yum installer.
Other VNC viewers can also be used but we recommend the usage of TurboVNC, an accelerated version of TightVNC designed for video and 3D applications, since we run the TurboVNC server on the visualisation nodes and the combination of the two components will give the best performance for GL applications.
Preparation of Hazelhen
Before using vnc for the first time you have to log on to one of the hazelhen front ends (hazelhen.hww.de). Create a .vnc directory in your home directory and run
user@eslogin00X> vncpasswd
which creates a passwd file in the .vnc directory.
Starting the VNC server
To start a VNC session you simply have to login to one of the front ends (hermit1.hww.de) via ssh.
user@client>ssh hazelhen.hww.de
Then load the VirtualGL module to setup the VNC environment and launch the VNC startscript.
user@eslogin00X>module load tools/VirtualGL
user@eslogin00X>vis_via_vnc.sh
This will set up a default VNC session with one hour walltime running a TurboVNC server with a resolution of 1240x900. To control the configuration of the VNC session the vis_via_vnc.sh script has optional parameters.
vis_via_vnc.sh [walltime] [geometry] [x0vnc] [-msmp | -mem256gb | -mem128gb] [memory] [-s]
where walltime can be specified in format hh:mm:ss or only hh.
The geometry option sets the resolution of the Xvnc server launched by the TurboVNC session and has to be given in format widhtxheight.
If neither of the -msmp, -mem256gb nor the -mem128gb option is used the default node type with 512 GB main memory is used.
If x0vnc is specified instead of a TurboVNC server with own Xvnc Display a X0-VNC server is started. As its name says this server is directly connected to the :0.0 Display which is contoled by an X-Server always running on the visualisation nodes. A session started with this option will have a fixed resolution which can not be changed.
There is also a --help option which returns the explanation of the parameters and gives examples for script usage.
The vis_via_vnc.sh script returns the name of the node reserved for you, a display number and the IP-address.
VNC viewer with -via option
If you got a VNC viewer which supports the via option like TurboVNC or TigerVNC you can simply call the viewer like stated below
user@client>vncviewer -via hazelhen.hww.de <node name>:<Display#>
VNC viewer without -via option
If you got a VNC viewer without support of the vis option, like JavaVNC or TightVNC for Windows, you have to setup a ssh tunnel via the frontend first and then launch the VNC viewer with a connection to localhost
user@client>ssh -N -L10000:<IP-address of vis-node>:5901 &
user@client>vncviewer localhost:10000
Enter the vnc password you set on the frontend and you should get a Gnome session running in your VNC viewer.
GL applications within the VNC session with TurboVNC
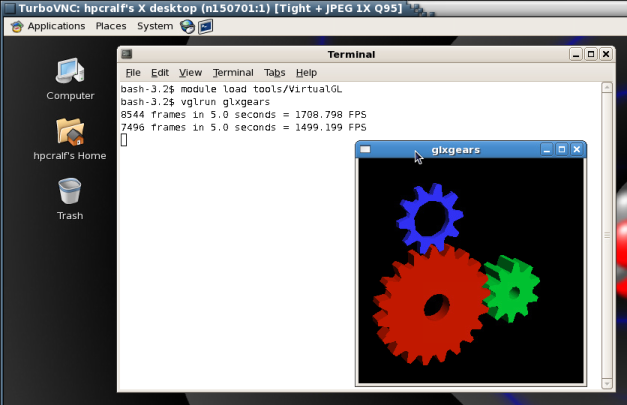
To execute 64Bit GL Applications within the VNC-session you have to open a shell and again load the VirtualGL module to set the VirtualGL environment and then start the application with the VirtualGL wrapper command
user@vis-node> module load tools/VirtualGL
user@vis-node> vglrun <Application command>
GL applications within the VNC session with X0-VNC
Since the X0-VNC server is directly reading the frame buffer of the visualisation node's graphic card, GL applications can be directly executed within the VNC session without using any wrapping command.
Ending the vnc session
If the vnc session isn't needed any more and the requested walltime isn't expired already you should kill your queue job with
user@eslogin00X>qdel <jour_job_id>
VirtualGL Setup (WITHOUT turbovnc)
To use VirtualGL you have to install it on your local client. It is available in the form of pre-compiled packages at http://www.virtualgl.org/Downloads/VirtualGL.
Linux
After the installation of VirtualGL you can connect to Hazelhen via the vglconnect command
user@client>vglconnect -s hazelhen.hww.de
Then call the prepare the visualisation queue job and connect to the reserved visualisation node via the vglconnect command
user@eslogin001>module load tools/VirtualGL
user@eslogin001>vis_via_vgl.sh XX:XX:XX
user@eslogin001>vglconnect -s vis-node
where XX:XX:XX is the walltime required for your visualisation job and vis-node the hostname of the visualisation node reserved for you.
On the visualisation node you can then execute 64Bit GL applications with the VirtualGL wrapper command
user@vis-node>module load tools/VirtualGL
user@vis-node>vglrun <Application command>
Visualisation Software
To use the installed visualisation software please follow the steps described below.
Covise
ParaView
Building Paraview
This info has been moved to the admin wiki.
Using Paraview
Serial client on pre-/postprocessing nodes
Allocate a pre-/postprocesisng node with the vis_via_vnc.sh script provided by the tools/VirtualGL module. On an eslogin node execute:
module laod tools/VirtualGL
vis_via_vnc.sh [walltime] [geometry]
Connect to the VNC-session by one of the methodes issued by the script. Within the VNC-session open a terminal and execute:
module laod tools/VirtualGL
module load tools/paraview/5.3.0-git-master-Pre
vglrun paraview
Launch parallel server on compute nodes
In order to launch a parallel pvserver on the Hazelhen compute nodes, request the number of compute nodes you need
qsub -I -lnodes=XX:ppn=YY -lwalltime=hh:mm:ss -N PVServer
On the mom node do:
module load tools/paraview/5.3.0-git-master-parallel-Mesa
aprun -n XX*YY -N YY pvserver
Once the server is running it should respond with something like:
Waiting for client...
Connection URL: cs://nidxxxxx:portno
Accepting connection(s): nidxxxxx:portno
showing that it is ready to be connected to an interactive client. Where nidxxxxx is the actual name of the headnode the pvserver is running on and portno is the port number the pvserver on the headnode is listening to waiting for a client to perform the connection handshake.
Connect to parallel server from multi user smp nodes
To connect interactively to a parallel pvserver running on the compute nodes first of all allocate yourself a VNC-session on one of the multi user smp nodes by using the -msmp option of the vis_via_vnc.sh script.
module load tools/VirtualGL
vis_via_vnc.sh 01:00:00 1910x1010 -msmp
Connect to the VNC-session by one of the methodes issued by the script. Within the VNC-session open a terminal and execute:
module load tools/paraview/5.3.0-git-master-Pre
pvconnect -pvs nidxxxxx:portno -via momX
Where nidxxxxx:portno is the string returned by the pvserver with "Accepting connection(s):" and momX is the name of the mom node to which your qsub for the pvserver was diverted to. For academic users this is one of network1 to network6. The pvconnect command will launch a paraview client that is already connected to the specified pvserver.
Known Issues
- Missing D3 Filter:
If you loose the connection to the pvserver and do a reconnect from within the the same ParaView client that had lost the connection, you will probably find the D3 Filter missing in the Filters menu. To avoid this issue you have to shut down the ParaView client once the connection to a previously server is lost and do a new connection from within a new ParaView Client. Alternatively use again the pvconnect command explained above.
CAE Software
To use the installed cae software please follow the steps described below.
Fluent
The usage via VNC enables the possibility to use GUI on the pre nodes. For this purpose enable a VNC session and start your VNC viewer on your local machine. See description above for details.
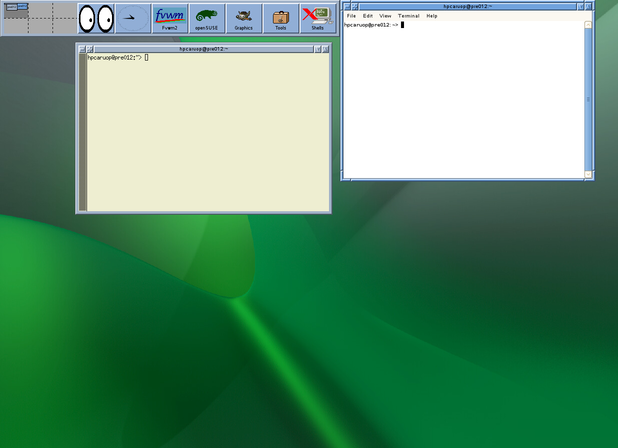
If everything worked, a x-terminal screen will appear:
A VNC session via ssh on the pre/postnode is established and you are connected.
Start your work now. For example for Fluent type into the console the module load:
user@eslogin00X> module load cae/ansys/16.1
Note: You can use parallel jobs, but be aware about the number of cores of the machine. If you are not sure, type into a console: Start your work now. For example for Fluent type into the console the module load:
user@eslogin00X> cat /proc/cpuinfo
The output gives you the list of processor with number.
…
processor       : 31
…
The last processor info line gives the number of processors on that pre/post node. Since hyper-threading is active, 16 cores are available. The number of cores is (n+1)/2...
Start Fluent GUI in your desired working directory.
user@eslogin00X:/somepath/path/path/>fluent
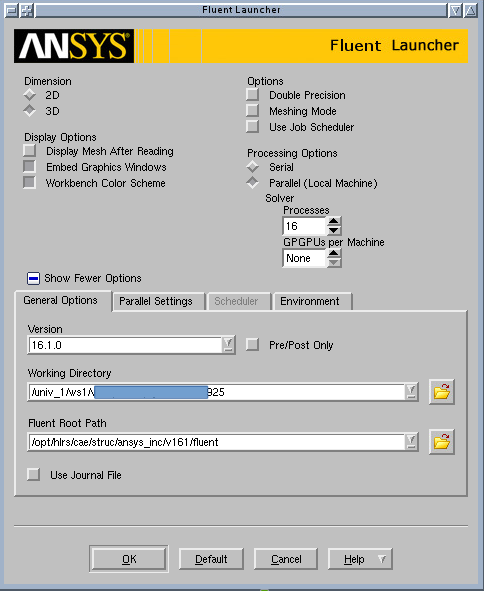
Adjust the set-up:
Click OK and wait, since fluent GUI will start up. Load your case, make changes if necessary. Now, you can test, if job would start. For this, fluent will run with 16 mpi-runs on that node.
Please Note: Do not run production runs, but short testing is OK. For production runs, use the run script method via frontend as usual!
Once you have finished, cancel your job, quit fluent and log out via:
Click on fvwm button and press exit. Shut down the x-terminal.
If you check on frontend via showq your jobs, the VNC session will still run if time is left. You can cancel that job with:
user@eslogin00X:/somepath/path/>canceljob <yourjobid>


