- Infos im HLRS Wiki sind nicht rechtsverbindlich und ohne Gewähr -
- Information contained in the HLRS Wiki is not legally binding and HLRS is not responsible for any damages that might result from its use -
How to use Web Based Services on HLRS Compute Platforms
This guide shows you accessing web-based services on HLRS Compute Platforms over SOCKS proxy.
This guide assumes:
- You have access to the Vulcan or Hawk cluster.
Warning: For security reasons;
- Don't start a service on the login nodes, but use services on the compute nodes.
- Only use 127.0.0.1 as the hostname for starting Web based services.
- Otherwise, your service will be accessible by everyone.
Modify your ssh config file
You can use the DynamicForward option with your SSH config (-D parameter if you do not use an SSH config). This will allow you to access local services running on the compute nodes over SOCKS proxy.
- Warning: Exercise caution with wildcards, as they may impact other hosts. Ensure there are no conflicts.
Host vulcan
    Hostname vulcan.hww.hlrs.de
Host n*
    Hostname %h
    ProxyJump vulcan
    SendEnv PBS_JOBID
    DynamicForward 8080
Host hawk
    Hostname hawk.hww.hlrs.de
Host r*
    Hostname %h
    ProxyJump hawk
    SendEnv PBS_JOBID
    DynamicForward 8080
Host hawk-ai*
    Hostname %h
    ProxyJump hawk
    SendEnv PBS_JOBID
    DynamicForward 8080
Create a new Firefox profile
We recommend using Firefox and creating a new profile for accessing the web services running on the compute nodes:
- Open
about:profiles, create and launch a new profile. - In the new profile open
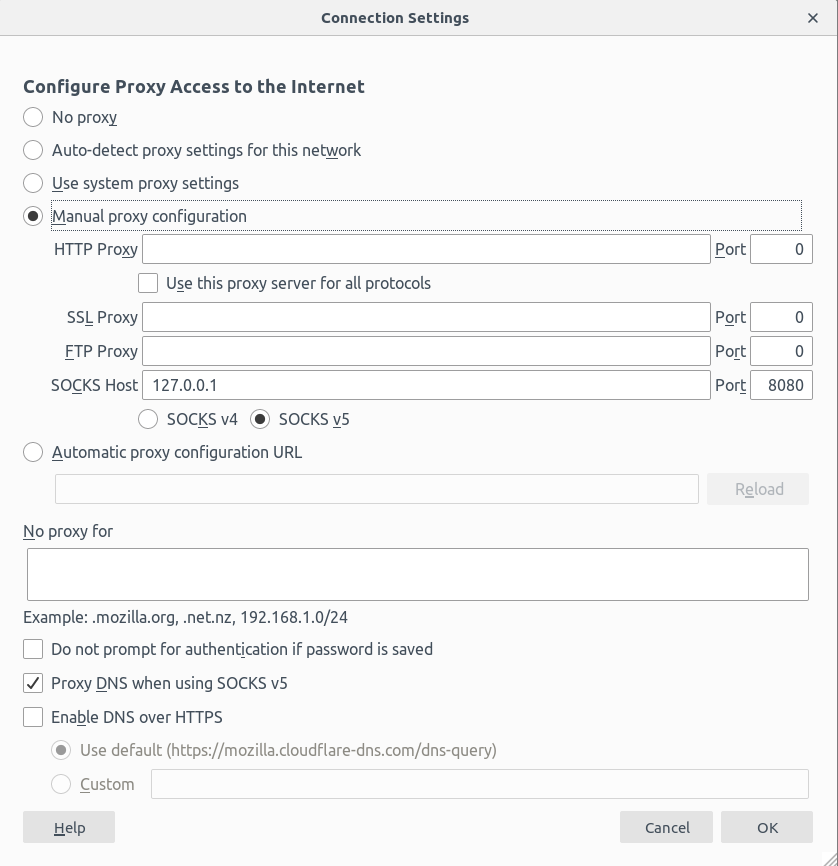
about:preferencesand search for proxy - Enter following settings (as shown below):
- Manual proxy configuration
- SOCKS Host: 127.0.0.1
- SOCKS Port: 8080
- SOCKS v5
- No proxy for - leave the field empty
- Proxy DNS
Starting from Firefox v67, you have to do this as well:
- Open
about:config - Find
network.proxy.allow_hijacking_localhostand set it totrue(Do NOT do this in your default Firefox profile! This may cause security issues when using proxies!)
Access the web-based service
To use the web-based service, first connect to the compute node running your job from your local computer.
On the login node:
qstat -anw # get the job id and the hostname
On your local computer:
export PBS_JOBID=JOB_ID # e.g., 2316419.hawk-pbs5
ssh COMPUTE_HOST # e.g., hawk-ai08
Check your SSH config in the first step if this doesn't work.
Then, launch Firefox web browser using the new profile. Open 127.0.0.1:PORT_NUMBER to access the service. The PORT_NUMBER is the port number set by the service (not necessarily 8080).
Example: JupyterLab
JupyterLab is a web-based, interactive development environment. On HLRS systems, a jupyterlab environment is available by default within a Conda environment. Follow the steps below to access JupyterLab running on a Hawk CPU node after configuring your local computer.
Note: The jupyterlab environment is read-only and is there for demo purposes only. For building custom conda environments, follow the instructions in the Conda environment builder repository.
Step 1: Secure a Compute Node Interactively
First, establish an SSH connection to the Hawk login node. Once connected, request an interactive session on a CPU node:
qsub -I -l select=1:node_type=rome -l walltime=01:00:00
Step 2: Launch JupyterLab
After securing a compute node, load the necessary Conda environment and start JupyterLab:
module load bigdata/conda
source activate
conda activate jupyterlab
jupyter lab --no-browser
Step 3: Establish Dynamic Port Forwarding
From the login node, determine your job ID and the hostname of the compute node allocated to you:
qstat -anw # Note the job id and hostname
On your local machine, replace JOB_ID with your actual job ID and COMPUTE_HOST with the hostname to set up dynamic port forwarding:
export PBS_JOBID=JOB_ID # e.g., 2316419.hawk-pbs5
ssh COMPUTE_HOST # e.g., r36c2t4n3
Ensure your SSH config file is correctly set up to allow this.
Step 4: Access JupyterLab
Open Firefox with the profile you prepared earlier and navigate to http://localhost:8888. Log in using the access token generated when you started JupyterLab. Jupyter will also print links with the integrated token.
Step 5: Clean Up Resources
To maintain efficiency and respect shared resources, terminate the JupyterLab process and release the compute node once your session is complete:
exit # Execute this on the compute node after stopping JupyterLab
Please ensure not to leave your JupyterLab session unattended.
